|
|
|
|
|
|
|
A
K-mount hole 3rd Edition "Pinhole
cameras are used for fun, for art and for science." Judging by the Internet publications, pinhole photography is not very popular in Russia. When a Russian photographer wants to experiment with equipment of pictorialists, he (or she) prefers to use homemade single element lenses. I made up my mind to write this article to popularize pinhole photography in that part of the world. On the other hand, I decided to demonstrate how easily and quickly one can make a removable pinhole lens for a Pentax SLR camera. Using a regular SLR camera for pinhole photography has many advantages. 1. It is convenient to use the viewfinder of an SLR camera. If the object is bright enough, it can be seen directly through the viewfinder eyepiece. If it is dark, you will have to substitute the hole with an equivalent regular lens to point your camera precisely. After that, you should reinstall the pinhole lens accurately without moving the camera body. 2. The exposure meter continues to operate when the pinhole lens is installed. Of course, it cannot always be used directly. Sometimes you will have to make a correction. However, it will always provide you with a good starting point. 3. Such a pinhole camera can easily be installed on a tripod. 4. You can use your regular film for pinhole photography. 5. Since the lenses are interchangeable, you can return to any regular glass lens at any moment. In multi-exposure mode, you can even combine a hole with any other available lens to produce a special effect. On the negative side, there are also a couple of drawbacks: 1. To avoid vignetting on flat film, one should keep equivalent focal lengths quite long. 2. Even if vignetting makes you happy, a wide-angle pinhole camera is impossible in this case, since the mirror prevents placing the hole close enough to the film. 3.
Images cannot be enlarged too much, since pinhole cameras have low resolution.
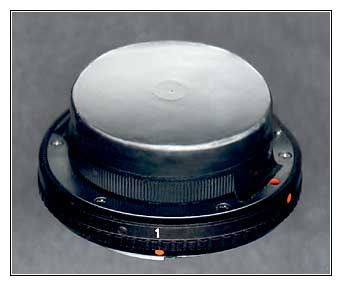
Thus, a 35 mm camera can produce relatively small pictures. Attaching a K-mount adapter to a hole In the picture below, you can see a K-mount (Pentax-compatible) pinhole lens. It consists of the following parts (bottom-up description):
2. Pentax K-M42 adapter (cannot be seen in the photograph) allows to install any type of screw-mount (M42) devices. 3. M42 extension ring #2. 4. A black flat cardboard ring (cannot be seen in the photograph) with an outer diameter of 46 mm. There is the 8 mm hole in its center. It just serves to make the device solid and durable. 5. Aluminum foil with a hole in the center. The diameter of the hole is 1/3 mm. The foil is stretched tightly over the cardboard ring and fixed with a piece of sticky insulation tape. Two
additional small pieces of the same insulation tape (you can see them
in the photograph) are used to block small holes in the adapter. I am
not sure it is necessary. I just wanted to secure the device against light
reliably. Lens specifications —
Equivalent focal length: 70 mm (it is long enough to prevent excessive
vignetting on flat film) To determine the right exposure, you can use the following formula: t1 / t2 = (N1 / N2) 2, where t is an exposure and N is an F-stop This
formula says we must increase exposure by 91 times for this pinhole lens
compared to the lens with an aperture of f/22. How to use it properly I would like to remind you several well-known general rules. If you want to get acceptable results, you will have to keep them in mind. 1. Despite larger granularity, high-speed film is most suitable for 35 mm pinhole cameras. 2. Since in most cases exposures will be quite long, you will have to install your camera on a steady tripod. 3. If you are going to use the build-in exposure meter of your camera, do not forget to attach a special finder cap, which is usually supplied with cameras, onto the viewfinder eyepiece. Otherwise, unwanted light will be able to reach the metering sensor, and the shot will be underexposed. Also, keep in mind that many Pentax cameras automatically switch to the center-weighted metering mode, when a non-autofocus lens is attached. Due to this and some other reasons, even the correct usage of the built-in meter leads to underexposure. If you want to use it, you will have to recalibrate the meter (read the next paragraph). 4. Use any regular 70 mm lens for pointing and metering. This metering approach is more precise, and you can use it to work out exposure compensations for the method described in the previous paragraph. To calculate exposures, use the formula from the Lens Specifications section. 5. Remember to apply reciprocity failure corrections, when exposures are longer than one second. Film manufacturers publish the exact values of such compensations in their official technical documentation. Some very rough figures are given in the following table:
6. Nevertheless, it is often impossible to calculate the correct exposure. Pinhole photography requires extensive use of the test-and-trial method. It is always a good idea to make several versions of the same picture. 7. The famous "sunny 16" rule transforms for such a camera (f/210) into the following recommendation: if sunny, the ISO400 film should be exposed for 1/2 sec.
Technology and theory I decided not to give a lot of material in this section, because there are many good articles in English about such things. You can read the texts mentioned at the end of this article to begin with. I calculated the diameter of the hole from the following formula:
I made the hole with an ordinary sewing needle. To check the pinhole size, I put the foil and my homemade ruler (with marks at every 1/3 of millimeter) on the glass of my flatbed scanner. Here is the result:
The epilogue that was written after almost two years On
April 25, 2004, I finally managed to participate in Yet another epilogue In
2005,
1.
Many other interesting resources are also available on the web. |
 1.
Pentax extension ring #1 provides compatibility with K-mount cameras.
1.
Pentax extension ring #1 provides compatibility with K-mount cameras.

|
|
|
|
® Igor Yefremov, 2002, all rights reserved You
must obtain a written permission from me to use any materials of this
site for any commercial or non-commercial purposes, unless there is an
explicit statement to the contrary. |
|