|
|
|
|
|
|
|
How
to make a simple lens hood? Introductory notes 1. I am not going to convince you that home-made hoods are always the best solution. On the contrary, I believe, a good lens hood from a reputable manufacturer should always be your choice. Hoods are not that expensive to be manufactured at home. However in rare cases, a home-made hood can be the only available hood. For example,
2. This article does not deal with optimal hoods. Instead, it offers a rough substitution. Nevertheless, even such inexact things can be efficient enough.
How to make a simple lens hood? The square hood, I am going to describe, is made from thick black paper or cardboard. For example, thick black paper for watercolor paintings will perfectly do. Such a hood is quite efficient and easy to make. Moreover, it can be folded easily, after which it will become almost flat. You may carry it in your wallet, if you like.
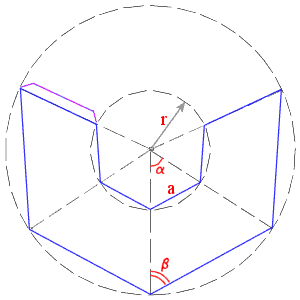
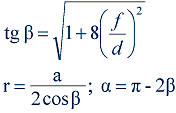
The diagram in Fig. 1 is self-explaining. All the angles and other parameters can be calculated from the above given formulas. (Several frequent cases from Appendix will help you to avoid trigonometric calculations.) However, you should keep in mind one important fact. Manufacturers typically do not inform us about precise values of focal distances of their lenses. Thus, I recommend that you should make your hood a bit wider (slightly larger alpha) to secure your shots against vignetting. The length of the line a should be equal to the diameter of the cylinder, onto which the hood is going to be installed. If the paper is not too thick, I recommend the line a be slightly smaller. In this case, a certain barrel deformation of the hood will be required to install the hood onto the lens, but the joint will be more reliable. As far as the length of the hood is concerned (half of the difference between the two diameters in Fig. 1), I would say the bigger the better. However, very big hoods are bulky. As a good starting point, you may make your hood as long as the diameter of your lens.
Is there any connection between hoods and pyramids?
|
|
|
|
|
© Igor Yefremov, 2003, all rights reserved You
must obtain a written permission from me to use any materials of this
site for any commercial or non-commercial purposes, unless there is an
explicit statement to the contrary. |
|